So on this track im confused if my suspension is too soft or hard or what.
I hit .99+ in some turns which tells me its too soft, but i catch air after the pits which tells me its too stiff. What am i missing. Thanks. Lmk if any info is needed.
So on this track im confused if my suspension is too soft or hard or what.
I hit .99+ in some turns which tells me its too soft, but i catch air after the pits which tells me its too stiff. What am i missing. Thanks. Lmk if any info is needed.
All tunes have trade-offs.
Sometimes we sacrifice getting through a minor section slower in order to get through major sections faster.
Sometimes we sacrifice top-speed for grip, and sometimes we sacrifice grip for top-speed.
…etc.
We can’t optimize every tune for every specific condition at a particular track, so we instead typically aim to tune to optimize total lap time based on how the most time can be gained.
Too soft.
Bottoming out isn’t a killer, and like Operator mentioned, everything’s a trade-off.
But I’d say this is too soft without a doubt. Either increase ride height and/or increase spring stiffness so that your suspension isn’t literally at 95%+ compression the majority of the time. When evaluating, you’re always looking at the outside wheels during a corner, the fronts under braking, and the rear under accel. To add, you want to note the track’s heaviest compression points (rises, or dips followed by a rise eg Brand’s Hatch T1). Lastly, you’re looking at curb action.
IMO, a good way to sus out the “best” compromise is to ensure that you can handle the majority of the track without bottoming out, but being on the softer side. If you have a certain part of the track that kills your suspension, you need stiffer springs or more height.
Some tracks absolutely require way more room than this, like the Nordschleife’s Sector 3 high-speed downwardish chicane, which will throw your nose up in the area and off track if you don’t respect the suspension travel.
Some tracks have rough surfaces and stiffer springs will kill traction, so prioritizing ride height with soft springs works best with those.
Try just increasing ride height then.
Thankyou ill try applying all this advice when less baked.
Did some tunning on this car, and it defo does not like low ride height, u should use max ride height, or stiffen up suspension ![]()
Example tunes [no forza aero = low front downforce]:


could be ride height too low.
Yeah i put the height around the middle who h is higher then i usually go so that might be it.
Your spring looks to be too soft for the weight of the vehicle. I would start raising by 10 and test. I’ve have had to run 1000+ on some cars.
its fine to me lol, if something works for u, does not mean it will work for me, i like high body roll, and this suspension is stiff enough not to hit 100% all the time. [i focus on making suspension as predictable as possible while still keeping high body roll, so suspension need to be soft so that its not affected by curbs]
If you like high body roll. Wouldn’t you use the ABRs to achieve that not springs?
well my arbs are kinda soft, just in middle. compared to meta 1/40 + max/max roll center
Low roll center will have the most noticeable body roll.
To me the arb and springs are kinda useless in the game bc the roll center, and anti dive, and anti squat show the most changes. Shouldn’t it be the other way around? Just don’t seem realistic to me.
I have a real hard time feeling the difference with some adjustments i make. Do you have tips for that?
This will help you get started
Starting with a default setup. What’s the vehicle doing for you? Pictures below as a reference.
—-
Tire pressure and temperatures vs Alignment / Camber / Toe / Caster tuning:
Use the following table as a general guideline to evaluate tire temperature readings:
Ideally The inside edge should be roughly 10 to 15 degrees Fahrenheit hotter than the outside edge, with the center being in the middle of that range. Can fine tune later, reduce extra unnecessary negative camber later to make use of the whole tires available grip.
| Center hotter than edges | Tire pressure too high. Reduce 1 psi for each 5′ F delta. |
|---|---|
| Edges hotter than center | Tire pressure too low. Add 1 psi for each 5′ F delta. |
| Inner edge hotter than outer | Too much negative camber. |
| Out edge hotter than inner | Not enough negative camber or too much toe-in. |
| Tire below ideal temperature range | Tire pressure too high, tire too wide, or springs/sway bars too soft at that axle. |
| Tire above ideal temperature range | Tire pressure too low, tire too narrow, or springs/sway bars too soft at that axle. |
| Front tires hotter than rear | Car is under steering (pushing). Too much front spring/sway bar, not enough rear spring/sway bar, front pressure too low, rear pressure too high, front tires too narrow, rear tires too wide. Front roll center height offset is too high vs the rear. |
| Rear tires hotter than front | Car is over steering (loose). Too much rear spring/sway bar, not enough front spring/sway bar, rear pressure too low, front pressure too high, rear tires too narrow, front tires too wide. Rear roll center height offset is too high vs the front. |
| —- |
Gear tuning:
Gear Tuning
Example: NASCAR Mustang Gearing
Match your gearing to the car’s powerband (6000–8400 RPM for NASCAR Mustang) while reaching top speed near redline in your final gear. This keeps you in the sweet spot of power and acceleration.
Use these as starting points. Adjust final drive and individual gears to match track layout, corner speed, and your shift style.
Homestead-Miami (Oval)
• 1st Gear: 3.80–4.30
• 2nd Gear: 2.60–2.90
• 3rd Gear: 1.90–2.20
• 4th Gear: 1.30–1.60
• 5th Gear: 1.00 (Direct Drive)
• Final Drive: 3.30–3.80
Aim to redline in 5th just before turn-in at max speed. Use higher gears in tighter corners.
Alignment / Toe tuning:
Alignment / Toe Tuning
For Road Courses:
• Front Toe-Out (0.1°–0.3°): Improves turn-in response and helps rotate the car on entry.
• Rear Toe-Out (0.1°–0.3°): Increases rear rotation — good for tighter tracks or aggressive driving.
• Front Toe-In (−0.1° to −0.3°): Adds stability on corner entry. Helpful if the car feels twitchy.
• Rear Toe-In (−0.1° to −0.3°): Improves traction and stability on corner exit. Use if the car feels loose coming out of turns.
Toe settings can drastically affect handling — especially balance and stability under braking or throttle. Keep adjustments small. Excessive toe can reduce top speed and cause extra tire wear.
Think of toe as the fine-tuning. It’s the icing on the cake — don’t overdo it.
Oval Track Toe Tuning
• Front Toe-Out (0.1°–0.3°)
Frees up the front end and improves initial turn-in. Useful for tighter ovals or when the car feels lazy entering turns.
More rotation, better entry response
Slight top speed loss with too much toe-out
• Front Toe-In (0.1°–0.2°)
Adds mid-corner and exit stability. More useful on high-speed tracks like Daytona where twitchiness is a concern.
Improved straight-line stability
Can reduce responsiveness on entry
• Rear Toe-Out (0.1°–0.2°)
Makes the rear rotate more, helping the car pivot off throttle. Great for aggressive driving and tighter ovals.
Loose car feel, better rotation off-throttle
Can hurt stability on exit and eat speed if overused
• Rear Toe-In (0.1°–0.3°)
Stabilizes the rear on exit and under throttle. A safer choice for longer runs or when you’re dialing in consistency.
Helps with traction and control on exit
Can tighten the car too much if overdone
Tip: If the car feels too tight, try small amounts of rear toe-out to loosen it up. If it feels too loose, a bit of toe-in will settle it. Just like you said — it’s a trade-off.
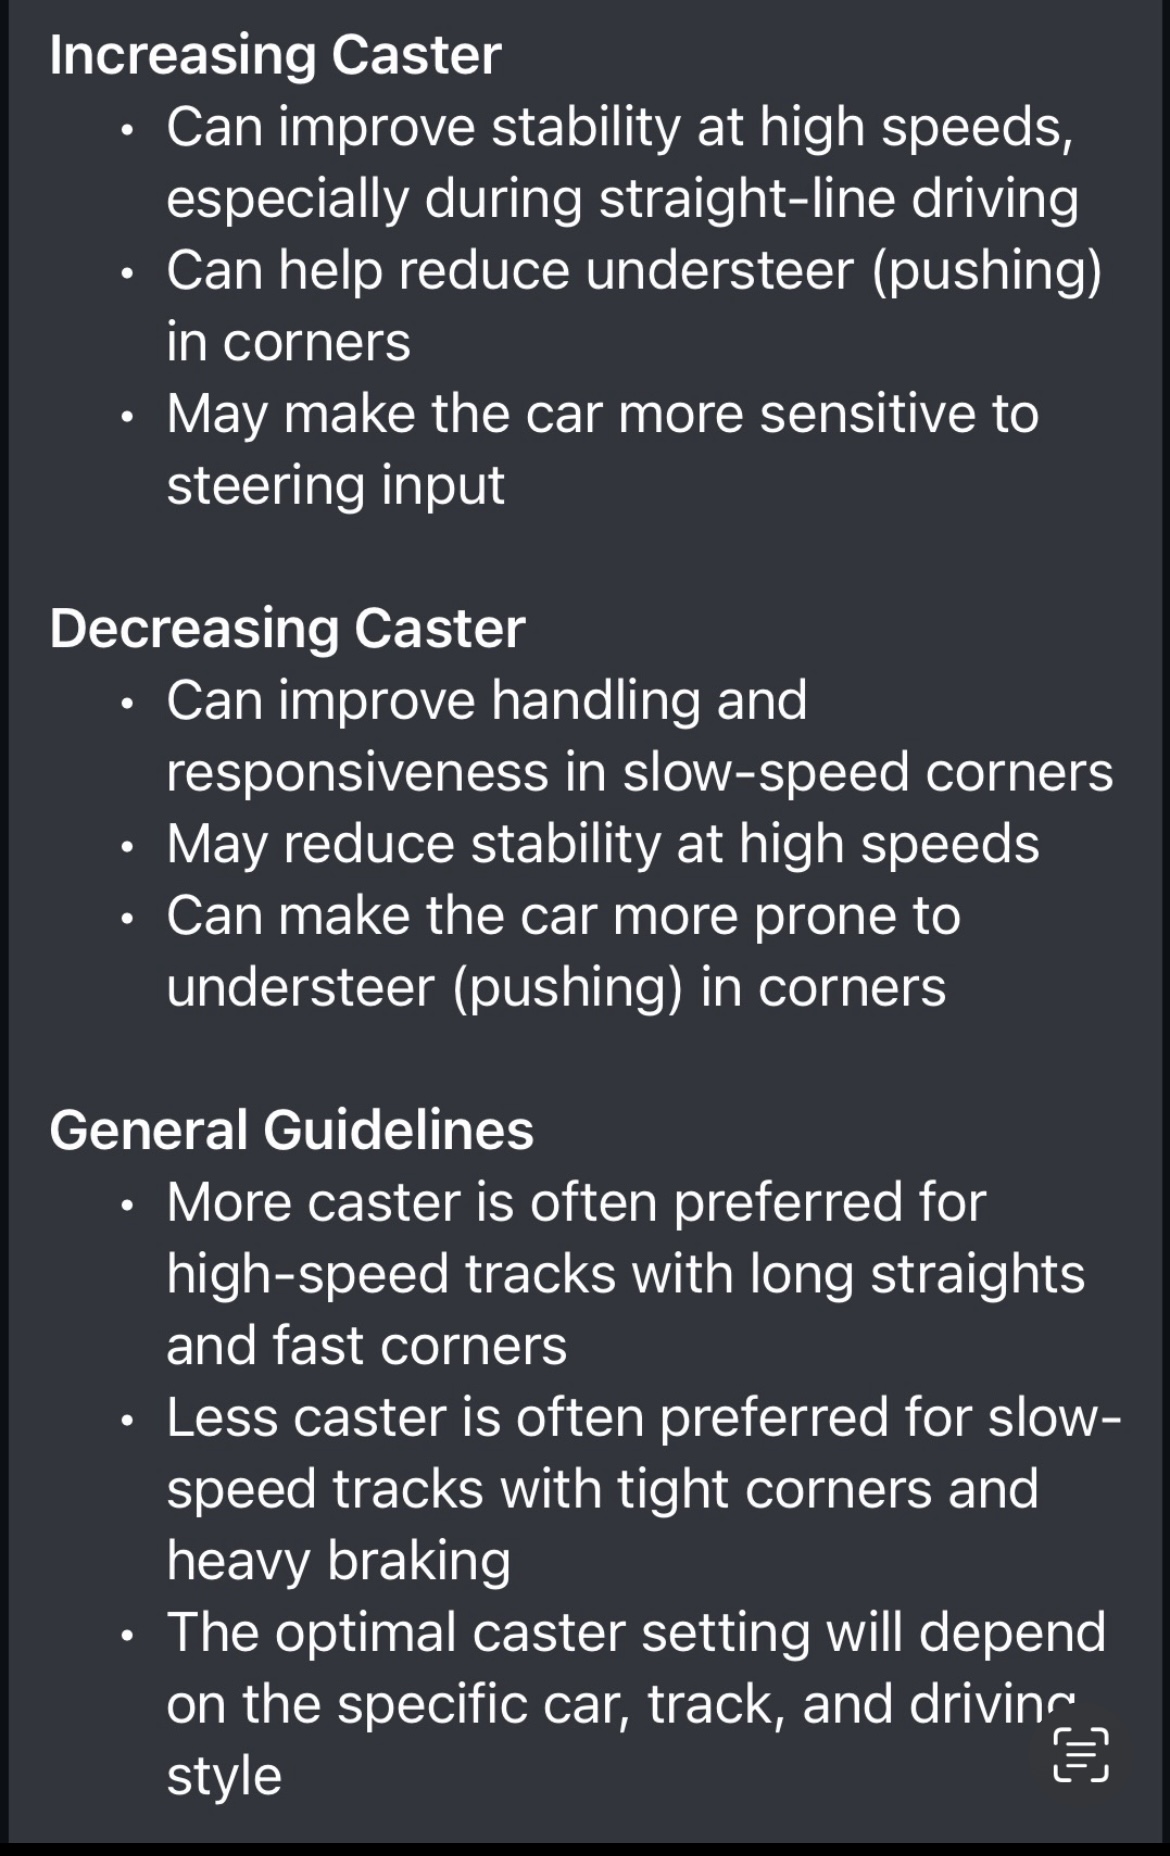
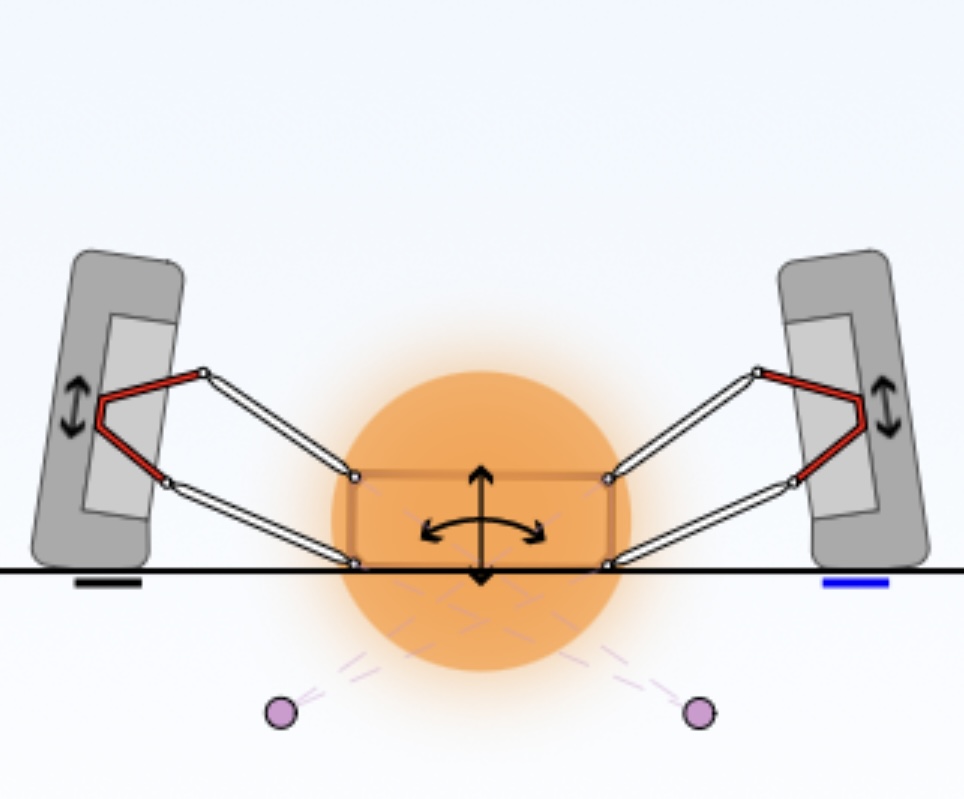
Alignment / Caster tuning:
—-
Anti-roll bar tuning:
Anti-Roll Bar Tuning
Road Course
Oval Track Tuning – Anti-Roll Bar
• Stiffer Overall: Oval tracks—especially high-speed ones—benefit from stiffer ARBs to reduce body roll and improve transitional response between banking and straights.
• Front vs. Rear Balance:
• Stiffer Front ARB: Increases understeer, stabilizes entry.
• Stiffer Rear ARB: Increases oversteer, can help rotation mid-corner but may make the car loose on exit.
• Balance Point: Finding the right stiffness split helps keep the car predictable during long corner loads.
• Banked vs. Flat Ovals:
• Highly Banked Tracks: You can run a stiffer setup without upsetting grip due to the natural banking support. This includes both springs and ARBs.
• Flat Ovals: Less banking support means you might need more compliance (softer ARBs or staggered stiffness) to keep all tires in optimal contact, especially mid-corner.
—-
Springs / Ride height tuning:
Spring Tuning and Ride Height Tuning
Spring Tuning
Stiffer Springs: Improve handling and reduce body roll, but can make the ride harsher. To stiff will compromise traction. On edge feel.
Softer Springs: Provide a smoother ride, but can compromise handling and increase body roll. Increased grip at a cost of body roll.
Spring Rate Distribution and Weight Distribution
Weight Distribution Considerations
By matching spring rates to the car’s weight distribution, you can achieve a more balanced handling characteristic and improve overall performance.
Oval track spring ratios:
Front: 800-1200 lb springs
Rear: 1000-1400 lb springs
These settings can provide a good balance between stability and handling on highly banked ovals. Experimentation as always, the best way to determine the optimal spring rates is through experimentation and testing. Start with these suggested settings and adjust them based on the car’s behavior and your driving style and performance needs. As we may adjust for more speed and lose stability to be competitive.
Ride Height Tuning
Lower Ride Height: Reduces aerodynamic drag, lowers center of gravity, and improves handling.
Higher Ride Height: Increases ground clearance, can improve ride quality, and may be necessary for certain track conditions.
Rake
The angle which the chassis ride height is sitting.
Up in the front and down in the rear
Down in the front and up in the rear
Interaction Between Springs and Ride Height
Spring Rates: Should be adjusted in conjunction with ride height to maintain optimal suspension travel and handling.
Damping: Should be adjusted to match the spring rates and ride height to control oscillations and maintain stability.
Oval Track
Spring Tuning
Stiffer Springs: Often used on oval tracks to improve stability and reduce body roll at high speeds.
Banked Turns: Stiffer springs can help maintain stability and control on highly banked ovals.
Ride height and its effect on alignment:
See pictures below for reference on ride height and (cog) center of gravity.
Here low to the ground, less camber will be needed to achieve the correct tire contact patch.
—-
Shock tuning
Shock Tuning Guide
Low-Speed Shock Settings
Prioritize handling, corner entry/exit control, and platform stability over high-speed bump absorption.
Example Settings:
• Front Bump Stiffness: 2.5
• Rear Bump Stiffness: 2.0
• Front Rebound Stiffness: 5.0
• Rear Rebound Stiffness: 4.0
High-Speed Shock Settings
Prioritize high-speed stability and bump absorption over low-speed precision. Ideal for tracks with high-speed sweepers and curbing.
Example Settings:
• Front Bump Stiffness: 4.0
• Rear Bump Stiffness: 3.5
• Front Rebound Stiffness: 8.0
• Rear Rebound Stiffness: 7.0
Note: These are just starting points. Actual values depend on car balance, track layout, tire grip, and your driving style. Tweak incrementally and test after each change.
—-
Suspension geometry tuning:
Suspension Geometry Tuning
Roll Center Height Offset
• Low roll center offset = More body roll
• High roll center offset = Less body roll
Roll center tuning adjusts how quickly the chassis transfers weight during cornering. Lowering the front roll center (or raising the rear) loosens the car. Raising the front (or lowering the rear) tightens it.
⸻
Body Roll Summary
• A small amount of body roll helps weight transfer and corner entry grip.
• Too much body roll reduces stability and mid-corner control.
Key is Balance: Use roll center, spring rates, anti-roll bars, and damping together to fine-tune the feel.
⸻
Anti Geometry Percentages
Anti-Dive (Braking Behavior)
• Negative values:
→ More body dive, softer front-end feel
→ Allows better weight transfer but may reduce braking stability
• Positive values:
→ Less front-end dive under braking
→ Flatter, more stable braking—may increase understeer on entry
Difficult to measure precisely in-game. Adjust in small steps and check how the car responds under hard braking.
⸻
Anti-Squat (Acceleration Behavior)
• Negative values:
→ More rear-end squat, promotes traction on exit
→ Can feel looser, especially with high-power cars
• Positive values:
→ Reduces squat under throttle
→ Keeps rear flatter, more stable on exit—but may reduce traction if overdone
Best tuned by feel and tire temps. Watch rear tire heat buildup during throttle-heavy zones.
—-
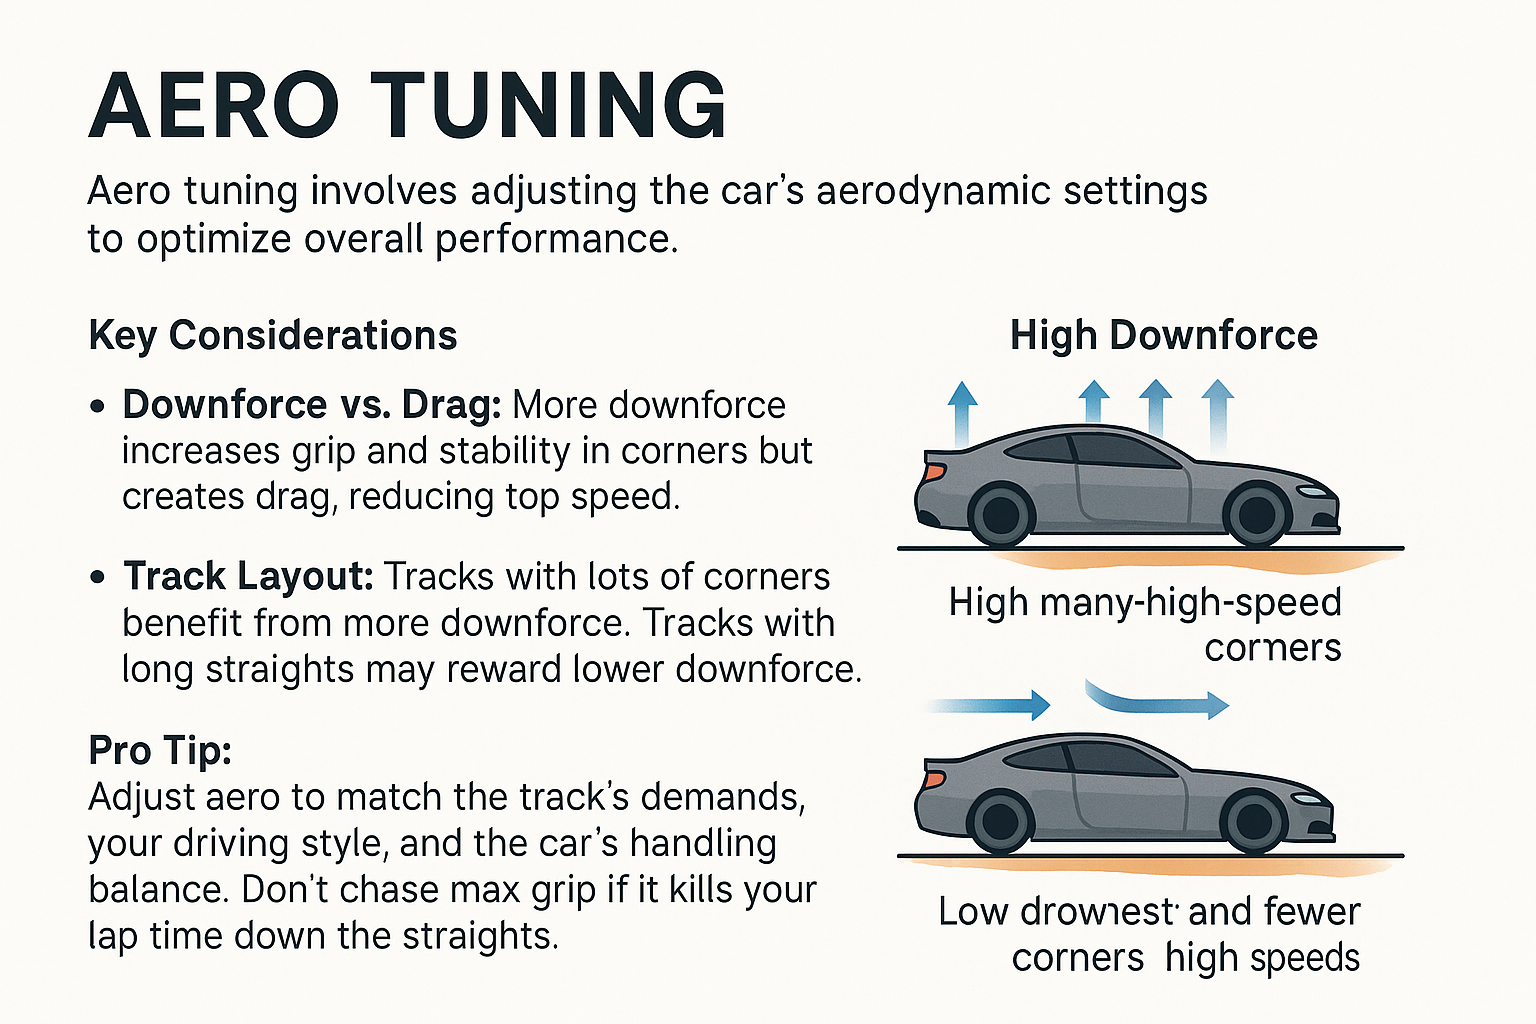
Aero tuning
Aero Tuning
Aero tuning involves adjusting the car’s aerodynamic settings to optimize its performance.
Key Considerations
Aero Tuning Strategies
By adjusting aero settings, you can optimize the car’s performance. Use what you need to be competitive.
—-
Brake tuning:
Brake Tuning
Brake tuning involves adjusting the braking force balance and pressure to optimize braking distance and balance.
Braking Force Balance
Braking Force Pressure
Optimizing Brake Tuning
Tips for Optimization
Cornering Balance
A car’s balance during cornering can be affected by its weight distribution and suspension settings.
Front-Heavy Balance
Rear-Heavy Balance
Finding the right balance between front and rear weight distribution and suspension settings can help optimize a car’s cornering performance.
—-
Differential tuning:
Differential Settings
Higher differential settings can improve traction, but may make the car less willing to rotate or change direction freely or can aid in controller slides. This can make it more stable, but less responsive to throttle input.
Trade-Offs
Traction vs. Rotation: Higher differential settings prioritize traction over rotation, making the car more stable but less agile. But the higher the acceleration setting can also make it easier to rotate the car under power. Popular setting in drifting.
Stability vs. Responsiveness: Higher deceleration differential settings can improve corner entry stability also helping aid rear lockup from excessive downshifts for a turn or snap oversteer commonly referred as. It may reduce the car’s willingness to rotate or change direction if the setting is too high.
—-
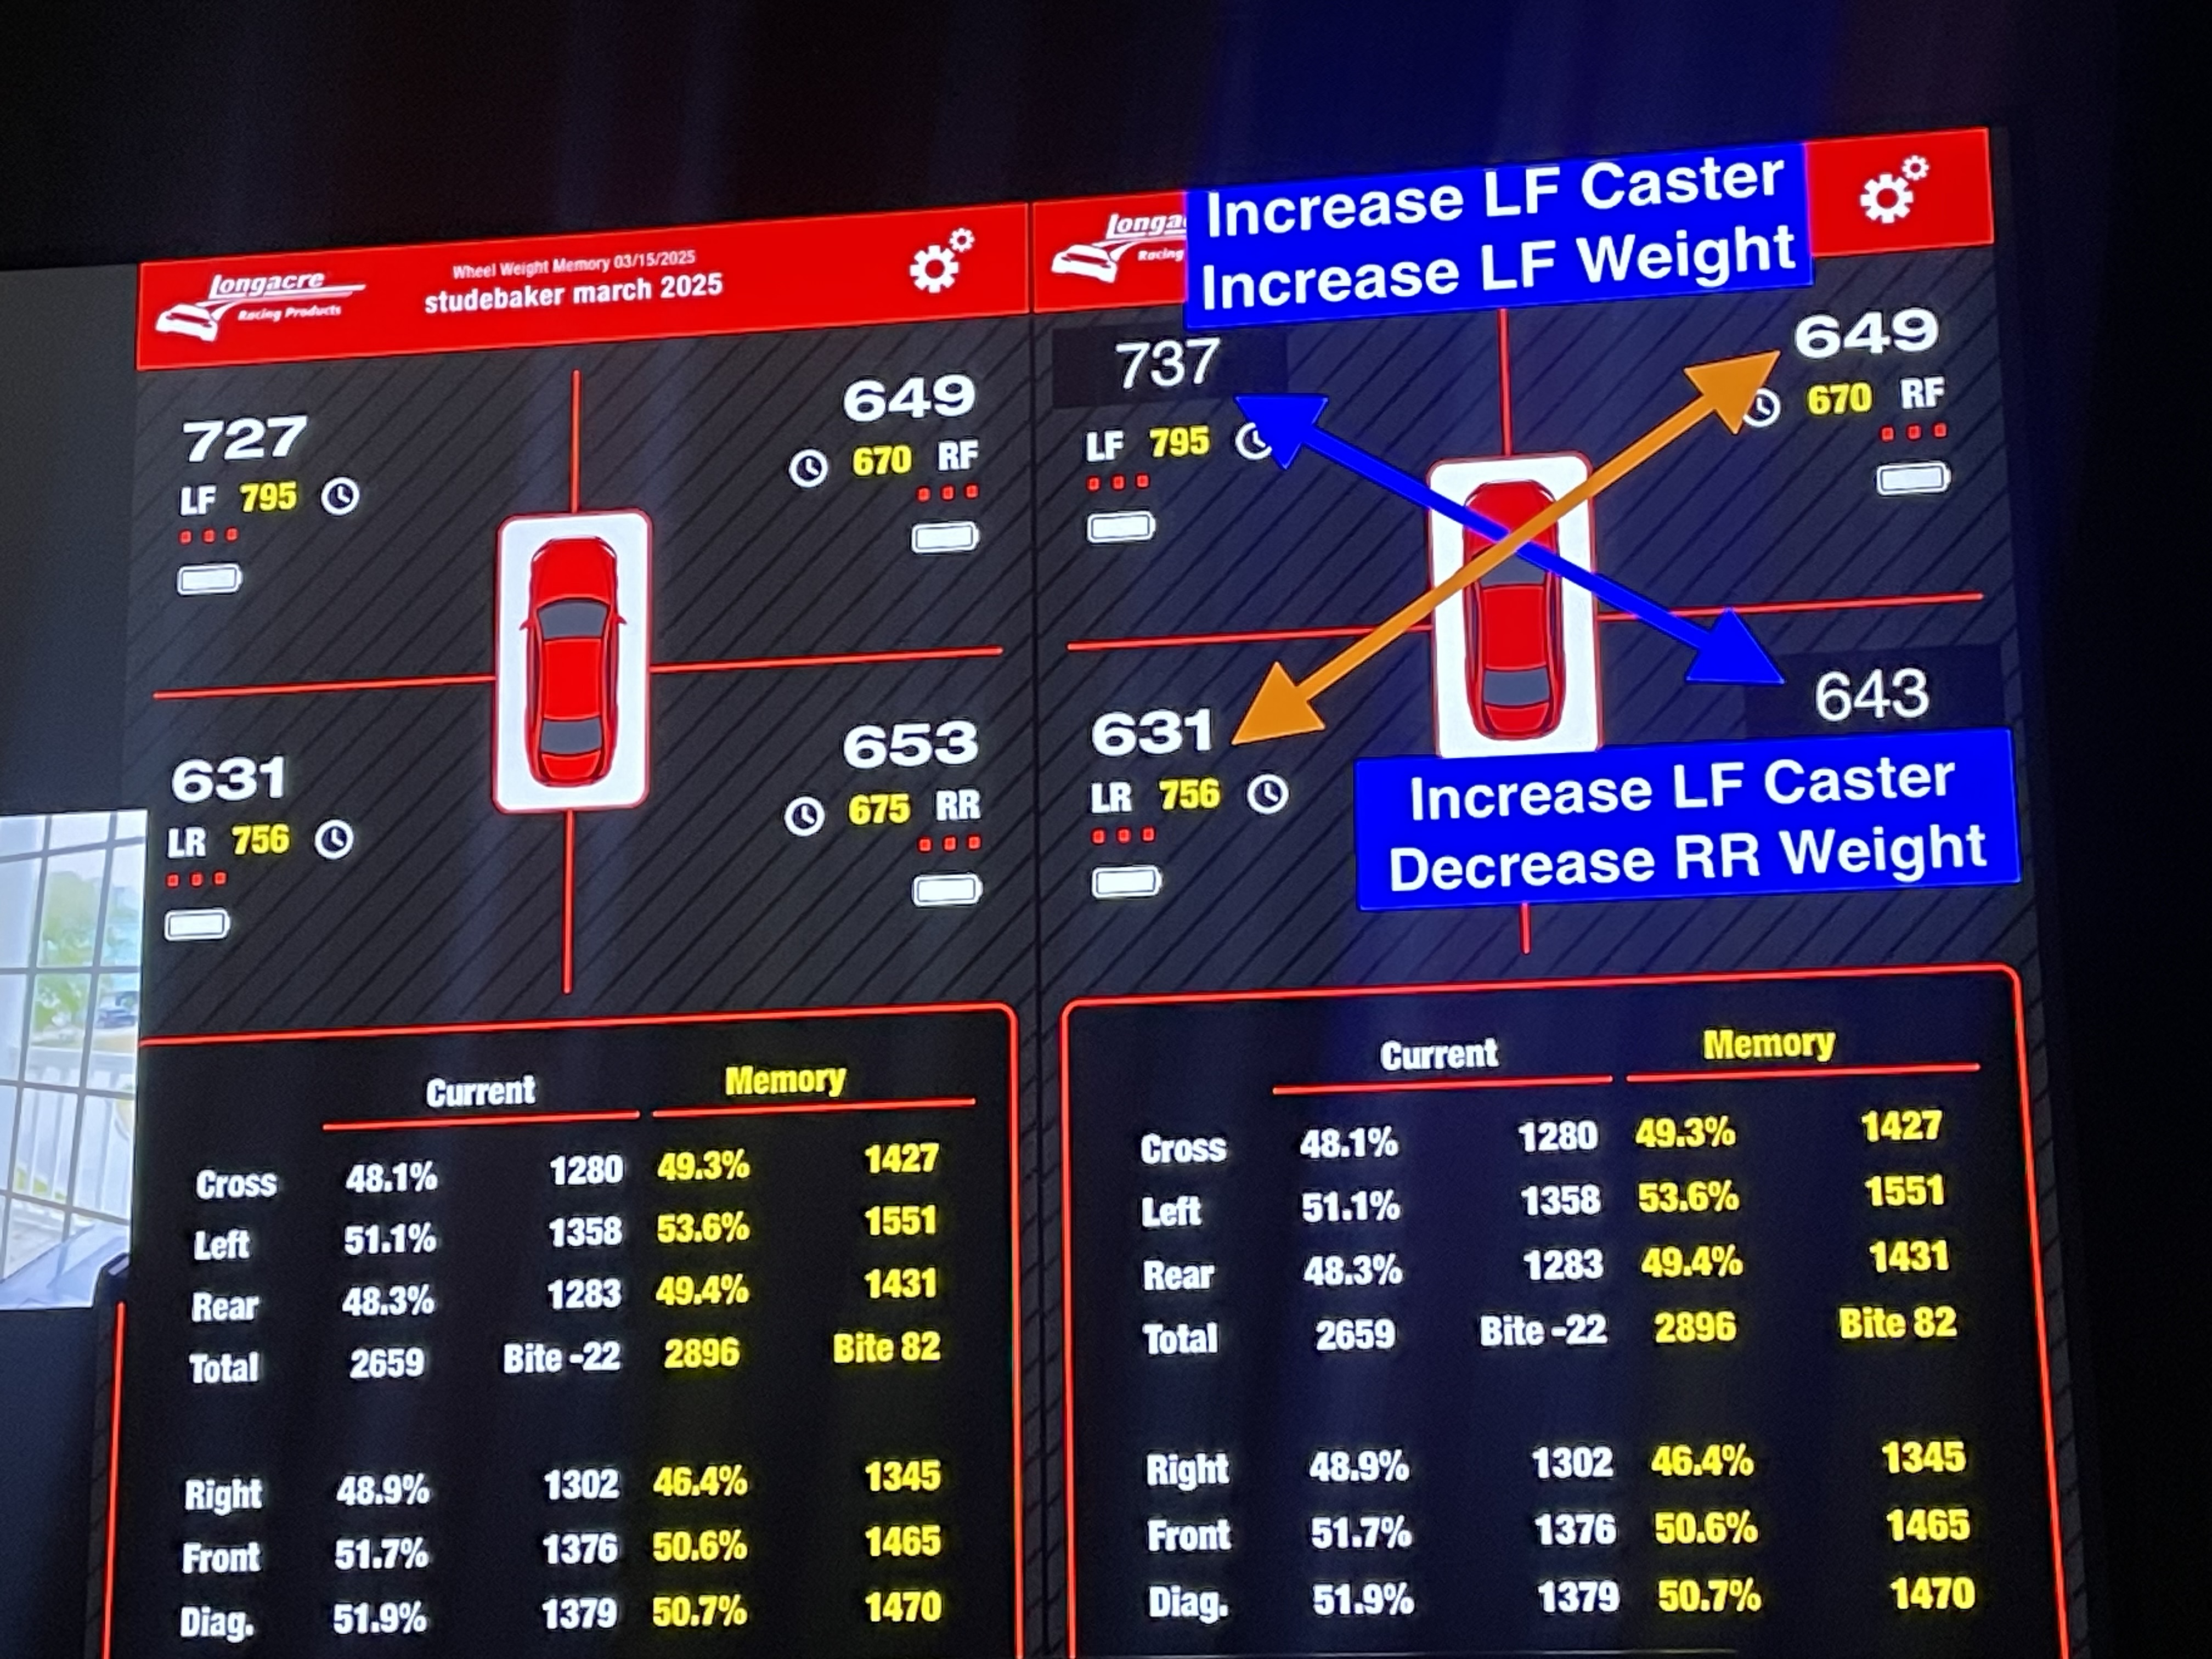
Shifting weight
SHIFT WEIGHT TOWARD A SPECIFIC CORNER
(With only front/rear tuning allowed)
⸻
Left Front
• Soften front springs
• Raise front ride height
• Soften front ARB
• Raise rear ride height
Right Front
• Soften front springs
• Raise front ride height
• Soften front ARB
• Raise rear ride height
Left Rear
• Soften rear springs
• Raise rear ride height
• Soften rear ARB
• Lower front ride height
Right Rear
• Soften rear springs
• Raise rear ride height
• Soften rear ARB
• Lower front ride height
—-
AERO & DIFFERENTIAL TUNING TO SHIFT WEIGHT
⸻
Left Front
• Increase front downforce (more grip = more load)
• Decrease rear downforce (shifts balance forward)
• Increase decel diff (more engine braking = more front load on entry)
⸻
Right Front
• Same as Left Front—Forza doesn’t allow side-specific aero, so use:
• Brake bias right (if braking only in right turns)
• Increase decel diff to emphasize weight shift under braking
⸻
Left Rear
• Increase rear downforce (adds load to both rear tires)
• Decrease front downforce (helps push balance rearward)
• Increase accel diff (pushes more power to both rears on exit)
⸻
Right Rear
• Same as Left Rear—again, no side-specific aero in-game
• Brake bias left (if cornering right)
• Increase accel diff (adds corner exit drive, more heat)
—-
I tried to compile all the useful tuning information I could find, and have learned over the years. I made it available all in one location. Hope this helps your tuning journey. If this helped you out show some love, and like the post. Thank you and good luck! ![]()
I thought you want inner outer and center to be same temperature? While under load in turns that is.
What do you mean when you say “Ideally The inside edge should be roughly 10 to 15 degrees centigrade hotter than the outside edge with the centre being in the middle of that range.”
Being the same temp leaves you no room for cornering harder as you’re already at the limit for that tire. So that little bit of extra negative camber gives you the chance to run the turn harder within reason. But that’s really on the edge and almost out of control.
Tires will roll and flex when cornering hard. So this temperature difference gives you a cushion so to speak. hopefully that makes sense now. Having a difficult time trying to get this to display properly so it’s easier to understand. Bare with me.
I’m fairly confident that min-maxing tire temps is strictly done in order to maximize tire wear, not grip
Assuming your alignment is dialed in, the game still adheres to this rudimentary rule of thumb where…
Less pressure = more grip (at the expense of slower response and increased temps)
More pressure = higher response (at the expense of grip)
Anything that deviates too far from the typical 27 - 35 psi range tends to exacerbate the negative characteristics to the point of being a net detriment, primarily tire wear when running too low/high (and heat generation when running too low)
In other words, let’s say a hypothetical car’s ideal tire pressure happens to be 34 psi in the rear; you could still find more grip running 27-29 psi at the expense of some tire wear, which might also be the ideal route if said tire wear doesn’t impact race strategy for its given application
I tend to run most tires between 27.5-30.5 psi, and the main things I’m looking at are compounds (harder compounds = slightly higher psi, say 29-32; slicks on the other end, like around 27-28.5), overall car weight (lighter cars, lower psi, heavier vice versa), and then general weight balance and tire widths (if a car is closer to 50/50 with a relatively square tire setup, I’m more likely to run square pressures; if a car is, say, heavily rear biased, like 43/57, with equally staggered tires, I’ll likely run slightly higher pressures in the rear accordingly). Feel like those factors influence temp ranges when it comes to said tires overheating too quickly causing a fall off of grip
Then there are other builds where you need to tame the rear as much as you can, so outside of the basic tuning procedures, you might run slightly lower pressures out back
Outside of that, I don’t think it’s worth the effort of staring at telemetry to ensure perfect heat distributions unless you’re heavily involved with long-stint endurance races and you REALLY need to maximize wear